Printers settings
Open Welcome (your name), Settings, then Printers. This is where administrators set up print servers, printers and minilab hot folders, and decide which product prints where. Members can view everything and operate the Loaded now and Pause controls; everything else needs an administrator.
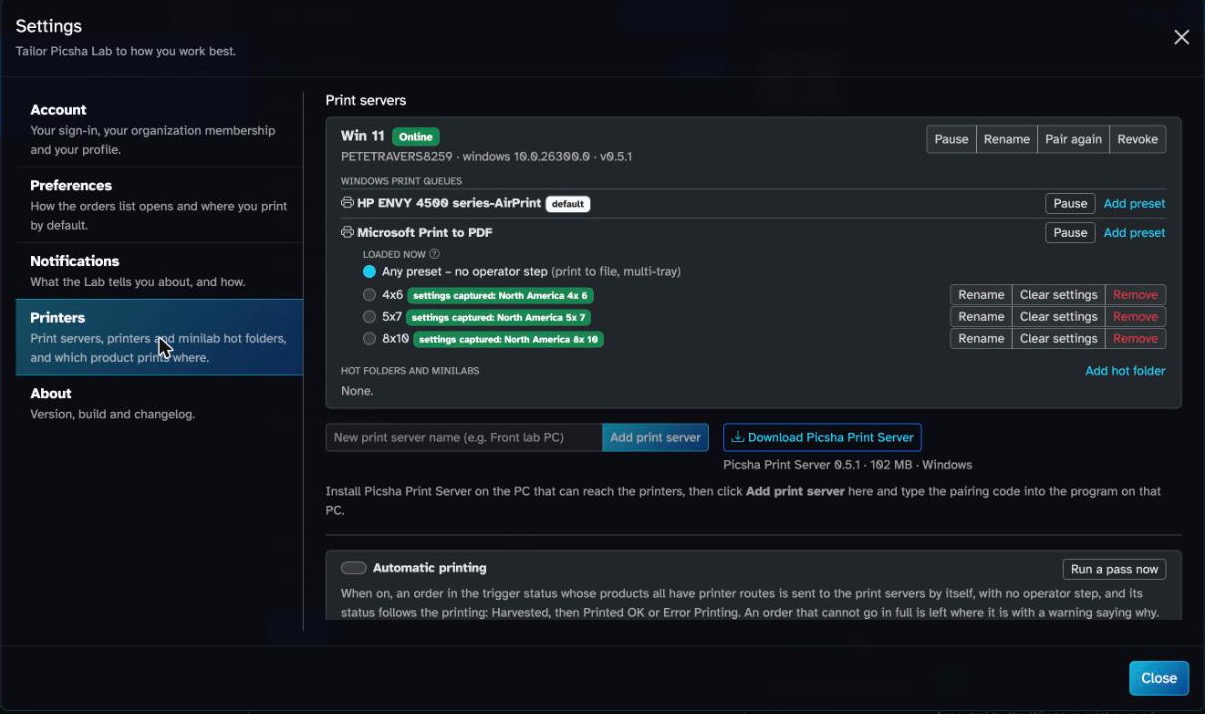
Print servers
Each print server has a card showing its status (Online, Offline since …, Paused, Waiting for pairing, Not paired or Revoked), its computer name, platform and version, and Update to … available when a newer version is offered.
To add a print server
- Type a name in New print server name and click Add print server. (Next to it, administrators see Download Picsha Print Server with the version and size: install it on the lab PC first if it is not there yet.)
- A pairing code appears. It works once and expires after 15 minutes. Type it into the Picsha Print Server program on the lab PC, as described in Picsha Print Server, then click Done.
Administrators can also Pause or Resume a print server, Rename it, issue a New code to pair it again, or Revoke it. A revoked print server stops receiving jobs until it is paired again.
Windows print queues
Every printer installed on the print server's PC appears under its card as a queue, as the print server reports it. A queue can show default, paused, the number of jobs waiting, or not seen on the last check-in when the printer has disappeared from the PC.
For each queue:
- Loaded now (any member): choose the preset that is in the printer, or Any preset for a printer that needs no operator step, such as a PDF printer or a printer with one paper. Jobs for other presets wait.
- Pause / Resume (any member): stop this queue while you service the printer. Jobs already being sent finish.
- Add preset (administrators): name one printer-and-media combination, for example "4x6 Luster". A preset shows settings captured with the paper name once its driver settings have been captured on the print server, or no settings yet (queue defaults) until then. Presets can be renamed, have their settings cleared, or be removed.
The recommended setup is one preset per paper you use on the printer. Its driver settings are captured once on the lab PC; see Picsha Print Server.
Hot folders and minilabs
A minilab that prints from a hot folder is added as a destination under the print server that can reach that folder. Click Add hot folder, choose the Kind, give it a Name, and fill in the fields for that kind. Existing hot folders have Edit and Remove.
| Kind | What you fill in |
|---|---|
| Noritsu hot folder (AUTPRINT.MRK) | The folder the Noritsu controller watches, and its print channels. Click Import ch_data.csv to load the channels from the controller's channel file, or Add channel to type them. |
| Fuji MS01 / JobMaker | The JobMaker hot folder, the image folder (and the same folder as the PIC sees it, if it differs), the printer, surface and auto-correct settings, and the print codes from the PIC's Quick Print list. |
| Fuji Frontier 330-390 (US Standard order file) | The order-file folder, the image folder (and as the Frontier PC sees it), and the DI software's print size names. |
| Fuji Frontier 330-390 (C4/C5 condition.txt) | The order and image folders, the DI software's device name, the resize option, a backprint line and the print sizes. |
| Fuji Frontier PIC Pro | The order, merge (container) and image folders, how long to wait for the PIC, whether orders are released automatically, colour or black and white, retouch, an optional logo file and its position, a backprint line and the print codes. Needs print server 0.4 or later. |
| Fuji Frontier PIC-ADPC | The order and image folders (and as the Frontier PC sees it), the source name the ADPC expects, colour or black and white, retouch, a backprint line and the print codes. |
| Agfa d-lab / PDM | Listed for completeness; not available yet. |
Folder paths are paths as the print server's PC sees them, for example a mapped drive or a network share. The Fuji Frontier kinds other than MS01 have not yet been checked against a live lab; tell Picsha support what you see when you first use one.
Automatic printing
Turn the Automatic printing switch on to send orders to the print server without anyone clicking. Choose the Trigger status (orders that reach it are sent; normally Submitted) and the Order types to include: orders from Picsha DAM, orders from online stores, or both. Run a pass now sends every eligible order immediately and reports what it did.
When updates are enabled for your organization, a Print server version field lets you pin the version your print servers should run. Leave it blank for the latest release. Pinning never downgrades a print server.
Product routing
The table lists every product, grouped by Source: DAM for products defined in Picsha Admin, then one group per connected online store app (for example Prints or Cards), whose products come from the store itself. For each product choose:
- Destination: Not routed, or a queue or hot folder, grouped by print server.
- Options: the Preset for a Windows queue, the Channel for a Noritsu hot folder, or the Print code or Print size for a Fuji destination.
A route saves as soon as the row is complete. Until then the row says Not saved yet and tells you what to choose. Choose the destination and its preset one after the other: the table refreshes itself every 15 seconds and a row left half-filled goes back to Not routed.
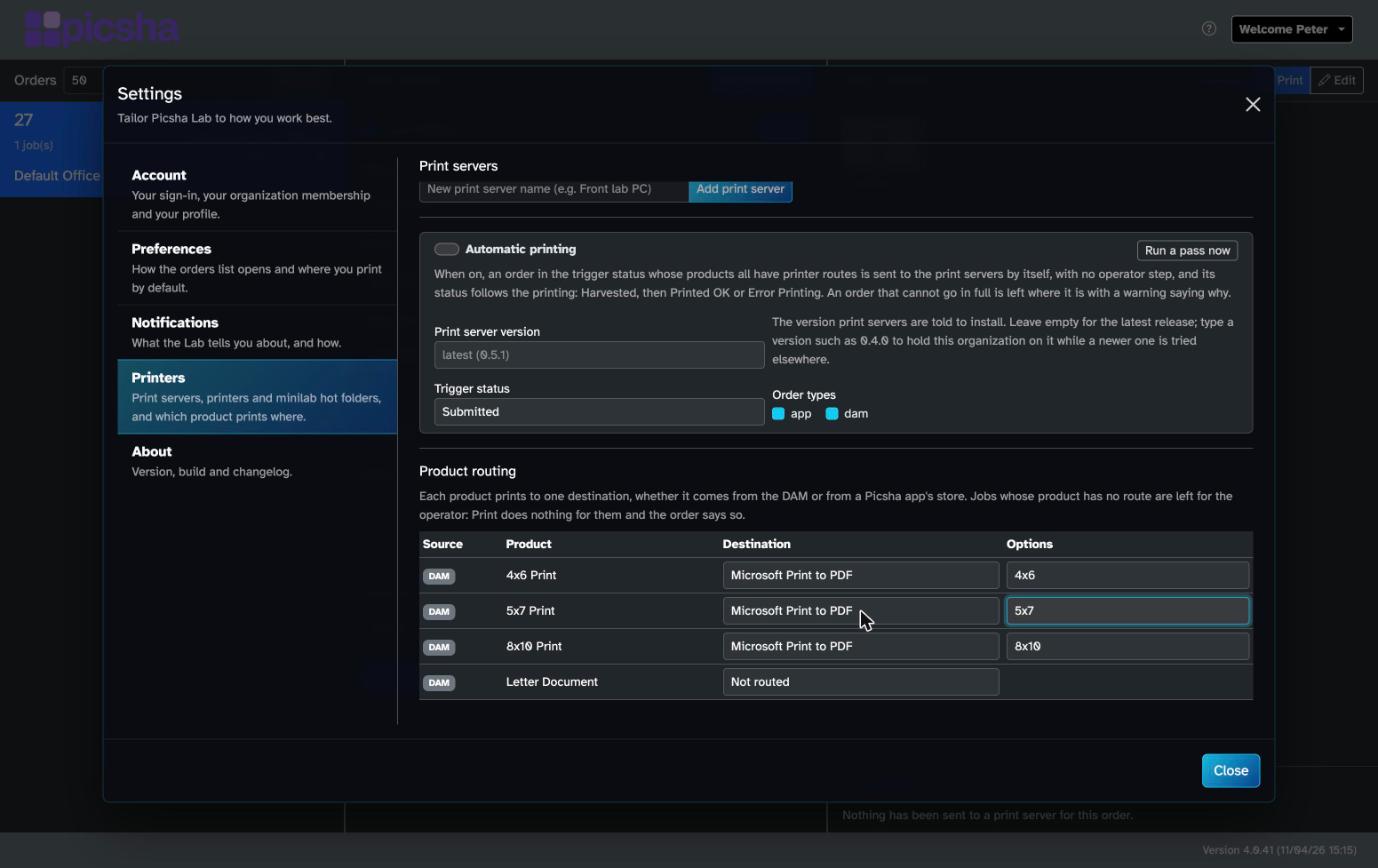 Destination unavailable means the route points at a printer the print server no longer reports or a destination that was removed; choose another.
A product with no route prints nothing. Orders containing it show not printing in the queue, and the Print dialog lists it as skipped.